1. Buy a custom domain name and point your account to it.
Instead of having your URL be www.yourwebsite.blogspot.com, you can have your URL be a more professional www.yourwebsite.com. You can buy a custom name either at a domain registration site or through Blogger (for $10 a year). Either way, set up the name by going to Settings --> Publishing ---> Publish on a custom domain. You can choose either to register with Blogger or you can use another registration site (if you do, follow the "Switch to advanced settings" instructions).
2. Play with the advance layout options to customize the look of your site.
Blogger has a fair variety of templates for your site. They aren't as snazzy as Wordpress templates, especially the premium (paid ones), but they are fully customizable. Here are three easy things to do:
- Add a custom header. At the "Layout" page, click on the Header box and add your own custom header image.
- Add a custom background. Go to "Template," click "Customize," and pick a basic template to start. Click the "background" link to add a custom background.
- Add custom details. Go to "Template," click "Customize," and start playing with all the details of each element of your blog. Here's an example of changing the various colors of links:
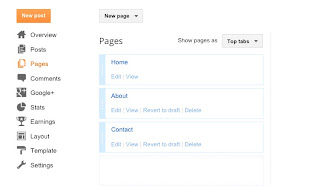
3. Add page tabs (About, FAQ, Contact).
Blogger lets you add up to 20 standalone static pages that show up under your header as tabs. Go to the "Pages" section to add and edit pages. Click on the option "Show pages as Top tabs" to get page tabs across your header:
Good pages to have are: About, Portfolio (if you're an artist), Books (if you're published), Contact, and FAQ.
4. Add a contact form.
Once you've set up your Contact page, you can create a form for it, using Google Docs. See my post on How to Make a Contact Page for Blogger for instructions.
5. Add social media icons.
Blogger includes social media sharing buttons for each post, but doesn't have a good gadget to allow people to follow you on your social sites. If you look to the top right of this blog, you'll see social media buttons that lead to my Twitter, Facebook, Google+, and Pinterest accounts, and that allow people to subscribe to this blog through an RSS reader or email.
The way to add the icons is to use the "HTML/Javascript" gadget. Here are my instructions on how to add social media icons to your blog (I learned how to do this from Adventures as a Small Town Mom but have learned some added tips since then). The set of circular social icons I used can be found here. If you want to choose other images, google "free social media icons" or check out: 33 Beautiful Social Media Icon Sets for Designers and Bloggers and 50 Free Social Media Icon Sets.
6. Add a favicon.
A favicon is the little icon that shows up next to a website address in the browser bar. Mine looks like this:
See my post, How to Add a Favicon to your Blogger Blog, for easy instructions.
7. Use the Picture gadget to link to other sites.
If you have an Amazon sales or Etsy page or a dedicated portfolio site, you can use the Picture gadget to feature the link in your sidebar. This blog uses a picture gadget to link to my Etsy store.
8. Add E-commerce features.
If you want to sell something directly from your blog instead of through a separate service, you can add a Paypal button to your blog, either in the sidebar or in a page or post that describes your wares. Go to your Paypal account's "Merchant Services" section for instructions.
P.S. If you're really ambitious, custom design your entire site.
By the way, if you know HTML coding, the sky's the limit for changing your Blogger blog into a website, as you can edit every part of your site. Web designer David Kutcher has blogged aboutsome amazing websites made on Blogger, and also provides useful tips on taking Blogger
sites to the next level at Blogger Xpertise.
source


No comments:
Post a Comment