
In creating a website within Blogger, one of our first real challenges was developing a way to provide a slideshow within the website that was fully customized to the needs of the design, but also could be managed by the site owners without needing to know HTML. The "embed slideshow" provided by Picasa didn't cut it for a number of reasons (limited customization, auto-start issues, didn't loop, was Flash, etc.), the widgets that people had created were also as problematic and both provided too many features that we didn't want while also not providing the features we did want.
We embarked on the quest to create the perfect slideshow, the slideshow that could be easily customized, but still contained easy to use management functionality so it could be handled by a non-technologist.
In our coding adventures we have created 5 types of slideshows, all managed by Blogger and/or Google products:
For this tutorial we're going to be demonstrating and providing sample code for example #5, using a Picasa web album (the default place where your Blogger blog's images are stored) and some RSS feed manipulation (similar to the recent Hangout on Air and post) as the means of managing all content aspects of the slideshow, then having CSS and Javascript variables handle the placement, style, and effects within the code.
Step #1: create your Picasa album
Nothing like a simple step to get the process started. Create your album, preferably with a simple name, no special characters, and no spaces if it can be helped. Add photos to the album.

Step #2: manage your photos
Give your images captions by clicking on the "add caption" link below each of the photos.

Step #3: change the permissions of the album
In order for the Picasa album to generate the RSS feed we need to change the album from its default permission of "private" to "public on the web". In the photo from Step #1, towards the top right corner, there is a lock icon that says "only you" with an edit link next to it. Click on the edit link and the following display window appears:
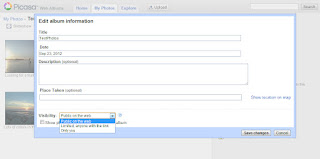
Change the "visibility" to be "public on the web" and hit Save changes.
Step #4: arrange the images
Going back to the main album page, click on the link for Organize to set the image order within your slideshow. You can set the order of the images in your album by a default order (such as by date or filename, or you can click and drag images to set your own order. Once done hit the Done button to save the order.

Step #5: the code
There is a lot of code here so unlike our normal practice of including it we're just pasting the clean version.
The code is comprised of 3 parts: the JQuery/Javascript and includes, the CSS styling for the two div elements, then the HTML div elements for where the slideshow and captions will be targeted. What we're doing in this code is establishing two div containers, one for the image slideshow and one for the image captions. Using JQuery, we're grabbing a RSS/JSON feed from Picasa of the album, then we're parsing out the received content into 4 arrays (slides, captions, heights, widths). Using these arrays, we then grab the first entry and set the containers with the first image and first caption. The CSS attribute of "background-size" is used to make the image fill the container on its largest axis (height or width). After the first image, we kick off the interval slideshow using the remainder of the images in the arrays. The javascript and CSS should go into your template before the </head> tag.
Using the divs of "slideshow" and "caption", you can place them anywhere within your page template and customize their dimensions using the CSS that is provided (or your own CSS). Change the heights and widths to suit your needs and the slideshow information will automatically fill them out properly. This information goes below the <body> tag but before the </body> tag, just about anywhere in your template.
Enjoy!
Questions or comments, please feel free to leave them in the comments below. If we make updates to the script we will post them here.
Additions!
2012-09-27: Per request we have added a random sort feature to the slideshow! Here is the code.
2012-09-29: Per request we have transformed the script into a function call! This allows you to place all of the script information into the template, but then place the style, divs, and executing script into a static page or blog post, and to set different albums for different pages within the site! Here is the code.
2012-10-30: If you're having an issue with the page jumping back to the top this is because the slideshow needs to be within a fixed container with specified height and width CSS attributes. You would make your divs look something like:
<div id='container' style='height: 600px; width: 500px;'>
<div id='slideshow'/>
<div id='caption'/>
</div>
We embarked on the quest to create the perfect slideshow, the slideshow that could be easily customized, but still contained easy to use management functionality so it could be handled by a non-technologist.
In our coding adventures we have created 5 types of slideshows, all managed by Blogger and/or Google products:
- converted a standard LinkList widget into a slideshow manager with each URL being the URL of the image in the slideshow and the title field being the optional caption (example)
- used a Google Docs spreadsheet as the content (caption, image url, target url) for generating a slideshow
- generated a slideshow from a specified RSS feed from the blog itself, using the first image of each post as the slideshow image (example)
- dynamically re-organized all images within a blog post into a slideshow (example)
- used a Picasa album's RSS feed to generate a managed slideshow (example)
For this tutorial we're going to be demonstrating and providing sample code for example #5, using a Picasa web album (the default place where your Blogger blog's images are stored) and some RSS feed manipulation (similar to the recent Hangout on Air and post) as the means of managing all content aspects of the slideshow, then having CSS and Javascript variables handle the placement, style, and effects within the code.
Step #1: create your Picasa album
Nothing like a simple step to get the process started. Create your album, preferably with a simple name, no special characters, and no spaces if it can be helped. Add photos to the album.

Step #2: manage your photos
Give your images captions by clicking on the "add caption" link below each of the photos.

Step #3: change the permissions of the album
In order for the Picasa album to generate the RSS feed we need to change the album from its default permission of "private" to "public on the web". In the photo from Step #1, towards the top right corner, there is a lock icon that says "only you" with an edit link next to it. Click on the edit link and the following display window appears:

Change the "visibility" to be "public on the web" and hit Save changes.
Step #4: arrange the images
Going back to the main album page, click on the link for Organize to set the image order within your slideshow. You can set the order of the images in your album by a default order (such as by date or filename, or you can click and drag images to set your own order. Once done hit the Done button to save the order.

Step #5: the code
There is a lot of code here so unlike our normal practice of including it we're just pasting the clean version.
The code is comprised of 3 parts: the JQuery/Javascript and includes, the CSS styling for the two div elements, then the HTML div elements for where the slideshow and captions will be targeted. What we're doing in this code is establishing two div containers, one for the image slideshow and one for the image captions. Using JQuery, we're grabbing a RSS/JSON feed from Picasa of the album, then we're parsing out the received content into 4 arrays (slides, captions, heights, widths). Using these arrays, we then grab the first entry and set the containers with the first image and first caption. The CSS attribute of "background-size" is used to make the image fill the container on its largest axis (height or width). After the first image, we kick off the interval slideshow using the remainder of the images in the arrays. The javascript and CSS should go into your template before the </head> tag.
Using the divs of "slideshow" and "caption", you can place them anywhere within your page template and customize their dimensions using the CSS that is provided (or your own CSS). Change the heights and widths to suit your needs and the slideshow information will automatically fill them out properly. This information goes below the <body> tag but before the </body> tag, just about anywhere in your template.
Enjoy!
Questions or comments, please feel free to leave them in the comments below. If we make updates to the script we will post them here.
Additions!
2012-09-27: Per request we have added a random sort feature to the slideshow! Here is the code.
2012-09-29: Per request we have transformed the script into a function call! This allows you to place all of the script information into the template, but then place the style, divs, and executing script into a static page or blog post, and to set different albums for different pages within the site! Here is the code.
2012-10-30: If you're having an issue with the page jumping back to the top this is because the slideshow needs to be within a fixed container with specified height and width CSS attributes. You would make your divs look something like:
<div id='container' style='height: 600px; width: 500px;'>
<div id='slideshow'/>
<div id='caption'/>
</div>
No comments:
Post a Comment